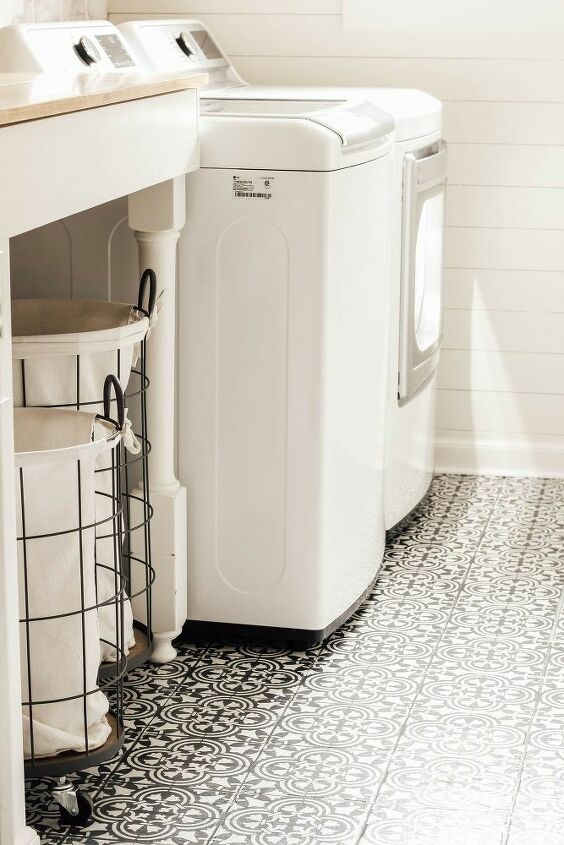
DIY Stencil Painted Tile Floors
I've had a laundry room makeover on my DIY to-do list for a while now. We had white ceramic tiles in the space and I knew they would be perfect for painting. When Cutting Edge Stencils reached out to me and asked if I’d like to work with them, I didn’t even have to think about it. The painted tile floors were already on my list of upcoming DIYs.
The first thing you will need to do is move everything out of the space and give your floors a good cleaning. I vacuumed mine first then mopped them with TSP a few times. After the TSP, I mopped them with plain water.
Next, you will want to tape off any areas that you do not want to get paint on. I was able to skip this step because we pulled our baseboard up for the renovation and there was nothing else the paint could get on.
Using the dense foam roller, I primed the tile with 2 coats of Kilz primer. I wanted to make sure I had a good base layer before applying the paint. Follow the manufacturer’s directions for drying times and make sure your paint is completely dry before applying the next coat. I used a fan to speed up the drying times.
Once the primer was dry, I used the dense foam roller to apply 2 coats of Rustoleum Chalk Paint in Charcoal as my basecoat. Again, make sure your paint is completely dry between each coat.
You could also use a lighter color as you base and a darker color for your stencil. This is completely up to personal preference.
I selected the Augusta stencil from Cutting Edge Stencils and used Rustoleum Chalk Paint in Linen White for my stencil color.
You will want to start on a full tile. Lay your stencil down on the tile and apply a few pieces of tape so it doesn’t move. Roll your paint brush in your tray then roll it on a paper towel to get most of the paint off. Your paint brush should be just about dry when you roll the paint onto the stencil. If you’d like to see a video of how I did this, you can watch my Laundry Room Reno highlight on IG (the painted floors are toward the end of the story).
I used 3 stencils to help the project go a little faster. If you start to get paint build up on the stencil, you can wipe it off with a wet rag.
Once you have painted all of the full size tiles, you will need to fold or cut your stencil to get the rest of the areas. I chose to fold mine incase I decide to use the stencil again. These areas won’t look as neat and crisp and may require a little touch up with a small paint brush. Honestly, I didn’t do any touch ups. I wanted a vintage look and didn’t mind if it wasn’t perfect.
After the stenciling is completely dry, you can apply your sealer. We applied 4 coats of a water-based polyurethane. We already had a floor finish applicator so we used this to apply the sealer. You can also use the foam roller to apply the sealer.
I must be honest and say that I was dreading this project before I began. I wasn’t quite sure what to expect and it sounded very labor intensive. But honestly, it wasn’t nearly as difficult as I was thinking. It’s definitely a slow because of the paint drying times, but it’s not a difficult project.
However, if you are a perfectionist, this is probably not the best DIY project for you. No matter how much time and effort you put in, the painted tile floors will not come out perfect.
Please feel free to reach out to me with any questions you may have about this DIY. There is also lots of great info on Cutting Edge Stencils website. Their stencils can be used for a whole lot more than just floors and they have lots of inspiration on their website.


No comments