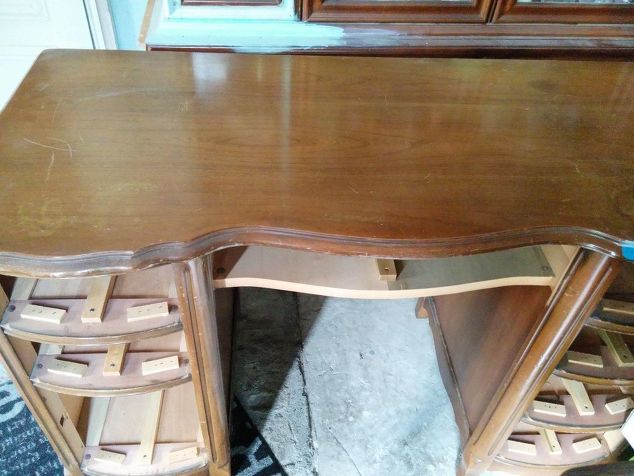
New Life for a Family Desk
This desk used to live at my in-law's house, many years ago. When she was selling their house, I received it from my mother-in-law. It was going to the landfill with a lot of other things that could be redone, so my husband told her I wanted it. So it sat in our second living room for years, piled with stuff and used by one of my daughters while she was in her first two years of college. This past summer I decided I wanted to give it another chance.
Time: 3 Weeks Cost: $50 Difficulty: Medium
Aside from the stains, scratches, watermarks, gouges, etc. I had never liked the color of this desk. It was a real pain to strip. I discovered there were two finishes on it, and some gunky uneven spots that had been finished over with the second finish. I'm not sure what it was, but with some stripping, scrubbing and scraping it finally came off.
I think I scraped as much wax as old finish off the drawers. I used lots of old rags, scrubbing pads from the dollar store, and scrapers to get all the finish off. After all the residue was cleaned off, and it was dry, I used my palm sander to take it down to the wood.
The top of the desk stripped down. If you don't look too closely it has an interesting grain. There were marks that wouldn't come out that you could see when close, even after stripping and sanding. I tried staining it at one end and found that more than one wood had been used in it and it wouldn't take the stain evenly. It was actually blotchy looking. So I stripped that back off, cleaned it up and sanded it as smooth as I could. A lot of work, but, worthwhile.
The weather didn't cooperate when I was finishing the drawers so I moved them into my kitchen. I wanted to give them any touch-ups before putting sealer on. Another nice thing about the sealer I used - no odor.
I decided to paint the inside and sides of the drawers a fuchsia color. It still has that fun vibe on the inside, but, more the sedate look on the outside. It has just the look I wanted.
This is the top after layering the chalk paint. I first wanted to paint it fuchsia as I mentioned before. I decided I wanted something calmer so I went with the blues. It's all chalk paint from Walmart in various shades of blue that I layered (Pool, Blue Lagoon and Ice which is a very pale whitish blue). I went with the lighter look for the top, then the sides and back. I decided to finish it on every side so I could put it anywhere I wanted. It becomes a very individual piece when you layer the different shades. It also takes some time and patience, but, I think it was worth it!
I decided to go with a two tone color. The top, sides and back are the pale blue (which looks almost white in the pictures) after lightening some of the blue chalk paint I was using and layering it until I got the look I wanted. I also dry brushed the lighter color on the drawers after going with the brighter blue for the drawer fronts. P.S. If your drawer boxes that the drawers slide into aren't open on the bottom (see first picture), do NOT put the drawers in without the hardware to see how it looks. It took me quite awhile to get them back out after that mistake!
This hardware was an ugly brass. I didn't want to replace them since I liked the design. First I scrubbed them really well. I bought metallic spray paint in silver and decided to do them myself. After they were silver, I sealed them with a clear sealer spray.
Here is the finished product. Although I did it months ago, I needed help taking it upstairs. So it has sat on my enclosed back porch under a drop cloth for months. So my daughter and her boyfriend helped me with it during a visit. Thanks Kam and Elizabeth! This is how it looks in my office/craft room.
The fuchsia color. A fun look when arranging the contents or opening a drawer.
I can't even remember how many coats of SamaN sealer I used, but, I let each coat dry well and lightly sanded before the next. I had used it for my kitchen table and decided to use up what I had left since it is a pricier sealer than I usually use. But, it goes on really well and puts a tough finish on when you take your time. I didn't want to waste it! Plus I think it will protect this desk.
So here she is in all her glory. I have the glass top that was cut for it years ago for the middle section (it's nice for putting pictures under) and will be cleaning it up and putting it on the top soon. Not bad for a piece of furniture my mother-in-law intended to throw away!


No comments